Gmail Plugin
Configuration
The Gmail Mail Plugin needs to be configured both on Odoo and Gmail.
Enable Mail Plugin
First, you need to enable the Mail Plugin feature in your database. Go to , enable Mail Plugin, and Save the configuration.
Install the Gmail Plugin
Open the Gmail Plugin Apps Script project.
Verify you are logged in using the Google account you want to install the plugin on.
Click on Publish then Deploy from manifest…

Important
Make sure you are using the legacy editor; otherwise the Deploy from manifest functionality may not be available.

Click on Install add-on. A “Deployment installed” notification should appear. You can then click on Close.

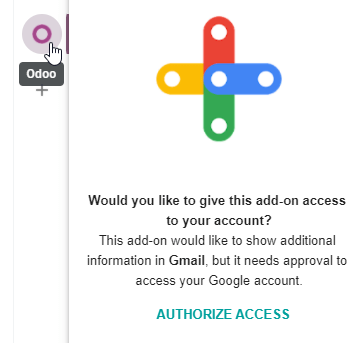
Configure your Gmail mailbox
Open any email in your Gmail mailbox. On the right-side panel, click on the Odoo icon and then Authorize Access.
Choose the right Google account.

Allow the Gmail Plugin to access some of your data.

The right-side panel can now display Company Insights. At the bottom, click on Login.

Note
Only a limited amount of Company Insights (Lead Enrichment) requests are available as a trial. This feature requires prepaid credits.
Enter your Odoo database URL and click on Login.

If you aren’t logged into your database, enter your credentials.
Click on Allow to let the Gmail Plugin connect to your database.
